Guides#
These guides will provide you an introduction to some of the more challenging unlocks in the game, such as those that involve Engineering. It is recommended to approach these guides with a trainer if you've not attempted them before.
Material Farming#
Materials are used to unlock Engineers as well as to engineer ship modules themselves. The following methods will quickly gather several high-grade Materials for engineering that you can then provide to a Materials Trader to get the whatever other materials you need.
Warning
The locations listed here are commonly known and widely used by the community at large. DO NOT approach or spawn into these locations in Open Play. These are popular griefing sites and you will be instantly shot upon getting close or spawning in. If you do accidentally choose the Open Play option from the Main Menu when you're doing a farming loop, Alt+F4 quickly during the loading screen to avoid being killed and relaunch the game in Private/Group Session.
Ship Engineering Materials#
Requirements#
- Any ship
- SRV
- Detailed Surface Scanner (on first visit)
Steps#
- In a
Solo/Private Group Session, go to System:KOLI DISCIIBody:C 6 A(bookmarked asRaw Materials Sitein Squadron Bookmarks) and perform aDetailed Surface Scan - Fly to the
Crash Siteand land nearby - Deploy your
SRV - Open your
Contactspanel to targetCargo Racks - Shoot at all
Cargo Racksand collect theRaw Materialsthat spawn - Quit to Main Menu and repeat until you fill the slots for all of the
Materialsyou've been collecting- The ship will not tell you when you max out the storage for a
Material- It will simply stop allowing you to collect more - You can see how much space a given
Materialhas available when targeting from within the cockpit by looking in the lower-left corner of the HUD
- The ship will not tell you when you max out the storage for a
- Trade these
Materialsaway for others at aRaw Material Traderto make room and repeat from the start
Expected Materials Gathered#
Tip
Don't try to shoot at all Cargo Racks and pick up after as spawned Materials will have roughly a 5-minute timer before despawning. Shoot one cargo rack at a time and collect those Materials before moving onto the next to make sure you don't waste material.
Requirements#
- Any ship
- SRV recommended (not required)
- Detailed Surface Scanner (on first visit)
Steps#
- In a
Solo/Private Group Session, go to System:HIP 12099Body:1 B(bookmarked asEncoded Materials Sitein Squadron Bookmarks) and perform aDetailed Surface Scan - The
Jameson Crash Sitewill appear as a target and you can fly to it- Once discovered, this will remain as a selectable target going forward when near the planet
- You can either:
- Land and deploy your
SRVor - Hover above the site - This is more challenging, but can be convenient, depending on your piloting skills
- Land and deploy your
- Using your
Data Scanner, scan theComms Controlsscattered around the site to collectEncoded Materials- Scan the ship itself for lore-rich audio logs! Press the play button at the bottom of the message to hear it.
- Quit to Main Menu to reset the
Comms Controlsand repeat until you fill yourEncoded Material Inventory- The ship will tell you as you max out the storage for each
Materialand it will stop allowing you to collect more - Continue scanning until it shows that no
Materialswere collected at least 2-3 times in a row before returning to theMaterial Trader
- The ship will tell you as you max out the storage for each
- Trade these materials away for others at an
Encoded Material Traderto make room and repeat from the start
Expected Materials Gathered#
Requirements#
- Any ship
- Supercruise Overdrive recommended (not required)
- Collector Limpet Controller
- Cargo Racks (Filled with Limpets, the more the better)
Steps#
- Open the
Galaxy Mapand set the following options:- Map Mode:
Pilot's Federation>State>Boom - Population Range:
- Minimum: One notch from the right
- Maximum: Far right
- Map Mode:
- Fly to the closest filtered system and scan the Nav Beacon
- Target and fly to any
High Grade Emissionssignal source- These are often decently far from the system star, which is where
Supercruise Overdrivecomes in handy - Check the
Time Remainingat the top-right of the HUD before setting out and make sure you have at least 5 minutes (10-15+ if you don't haveSupercruise Overdrive), otherwise you'll likely miss the window and waste time flying to the target only to have it disappear along the way - If the system does not have any High Grade Emissions signals, you will need to go to another system and repeat until you do
- These are often decently far from the system star, which is where
- Use
Collector Limpetsalong with yourCargo Scoopto collect all of the floating cargo until you seeNo Valid Collection Targetsand your Limpets return to hover near your ship- If you still see floating cargo in the area after this message appears, skip to
Step 7
- If you still see floating cargo in the area after this message appears, skip to
- Return to Supercruise and repeat until all
High Grade Emissionssignal sources are gone - Quit to Desktop (not Main Menu) and repeat until you fill your
Manufactured Material Inventory- The ship will tell you as you max out the storage for each
Materialand it will stop allowing you to collect more
- The ship will tell you as you max out the storage for each
- Trade these materials away for others at a
Manufactured Material Traderto make room and repeat from the start
As mentioned, these methods will quickly fill a few slots in your Material inventory and the ship will give an error when trying to pick up more of that resource. You can also check this from your ship or SRV (not on foot) by going to your Inventory tab in the Internal (Right) panel. Raw and Manufctured Materials share a tab and the game has an option the filter by Type. Raw is listed as Element here. Encoded Materials have their own tab.
You will need to offload these Materials to a Material Trader to make room for more high grade Materials. To do this, open the Components Trading page on Inara and choose the type of Material you're looking to trade (Raw/Encoded/Manufactured). You can also use the 3 Squadron Bookmarks for the 3 different types of Materials, found under Squadron Stations.
Once there, select any low or empty Material and request the max amount in trade for one of the Materials you just collected to empty space for more Material farming. Continue to repeat this to make room for the Materials you maxed out and repeat as you see fit. This will make more room for another round of farming to gather more Materials.
The Material Trader works as follows. Each horizontal line represents a single Material type. The columns are arranged by Grade 1-5, left to right. Counter-intuitively, trading "down" or "up" often refers to trading between Materials of the same type (visually horizontal in the Material Trader interface), while trading "sideways" refers to trading from one Material type to another (vertical in the Material Trader interface). Trading up or down is at a much better exchange rate than when trading sideways, so it's generally advised to first fill out all of the same material type, then start filling out your other sideways trades.
Feel free to explore this mechanic as you see fit as it's the primary method of gathering materials to make a powerful ship in Elite. Eventually, you can trade all Materials up, down and sideways to fill out every Material, guaranteeing a long-term supply of Materials for future upgrades, but this certainly not a requirement to get started with using the system.
Recommended Starting Materials
These materials can be used in the Synthesis section of your Inventory (Right) panel to generate useful refills and utilities in a pinch. When trading for materials, I recommend prioritizing these so you always have spares available and fill out everything else after. Many of these also used quite heavily in Engineering.
Raw#
| Item | Material [Grade] |
|---|---|
| Life Support Limpets SRV Repair |
Iron [1] Nickel [1] |
| SRV Refuel SRV Ammo Restock |
Sulfur [1] Phosphorus [1] |
| AFM Refill | Nickel [1] Zinc [2] Chromium [2] Vanadium [2] |
| FSD Injection | Carbon [1] Vanadium [2] Germanium [2] |
Manufactured#
| Item | Material [Grade] |
|---|---|
| Chaff | Compact Composites [1] Filament Composites [2] |
| Heatsinks | Basic Conductors [1] Heat Conduction Wiring [1] |
Odysee/Suit Engineering Guides#
These guides have not had a written companion prepared at this time, but still contain lots of useful information for those looking to gain a head-start.
Odyseey Ultimate Weapon Farming
Guardian FSD Booster#
Wiki | Video Guide#
The Guardian FSD Booster is a permanent unlock that allows you to purchase an Optional Internal Module as many times as you want using standard credits that can boost your jump range up to +10 LY, no engineering required.
Requirements#
- Medium or Small ship
- 8+ Cargo Space
- SRV Bay
- Point Defense Turret (Topside)
Steps#
- In a
Solo/Private Group Session, go to System:SYNUEFE PX-J C25-8Body:7 A- You may want to request a Fleet Carrier jump as this is approx.600 LYfrom the Bubble- Land at the
Guardian Structurewhere indicated in white, or as close as possible- There will be anywhere from 1-4 Guardians shooting at you during this mission
- They will shoot both low-power laser weapons that your
SRVshield should be able to handle without issue as well as missiles, which your ship'sPoint Defense Turretswill help defend against. - It is recommended to have at least 3 pips in Weapons with the rest in Systems. Concentrate fire on one Guardian at a time. It should take only 3-5 seconds to fully destroy a Guardian.
- DO NOT get out of your
SRVduring this time - DO NOT dismiss your ship - If you do, leave the area immediately and recall it to reposition
- Your SRV's turret mode will make aiming much easier for this section
- If needed, board your ship to fully repair the
SRV
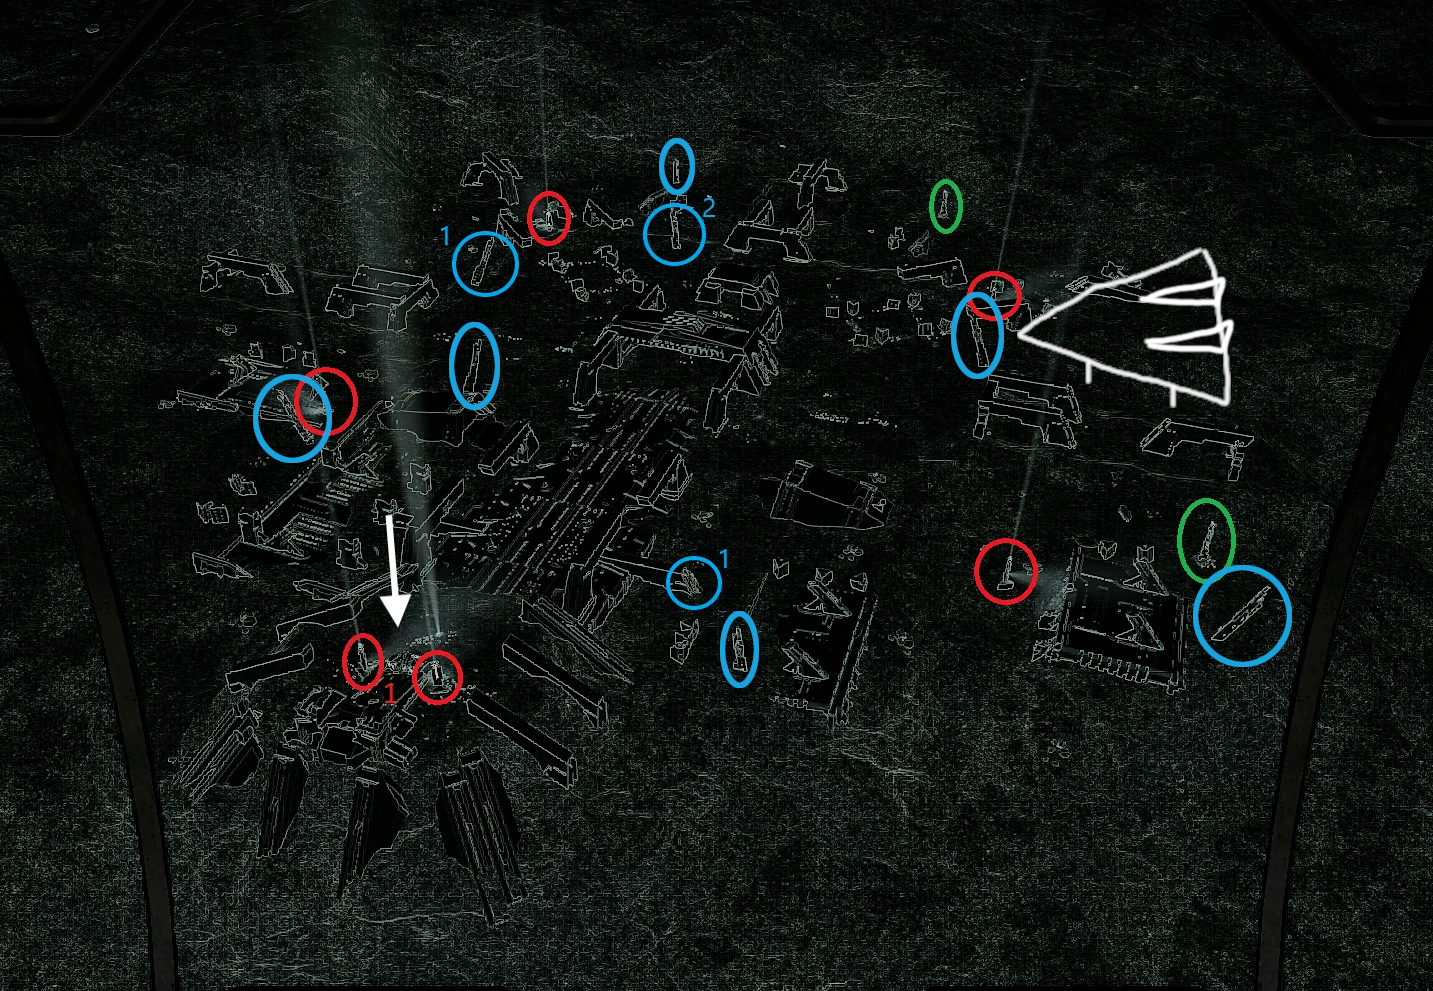
- Shoot the metal panels off the indicated pillars marked in blue
- Collect the ejected
Materialswith yourCargo Scoop- Make sure to target it and to open yourCargo Scoopor you will destroy the material! - Reapeat this for all pillars and relog until you have
21 Guardian Power Cellsand21 Guardian Technology Components
- Land at the
- Collect a
Guardian Relicfound at one of the pillars marked in green by shooting at it and collecting with your Cargo Scoop - Drive your
SRVdirectly over the main center structure and jettison yourGuardian Relicat the marked arrow in white - You will get a confirmation message if done correctly - With your
SRV Pulse Laser, shoot at the blue light on each of the pillars marked in red until you get a confimration message - Use your
Data Link Scanneron the sphere to gather yourGuardian Module Blueprint Fragment- You can use the turret view when using the
Scorpion, but if you're in theScarab, you'll need to drive onto the structure to tilt the front of the vehicle and point at it from the first-person cockpit view
- You can use the turret view when using the
- Return to the Bubble
- Farm/Trade
24 Focus Crystals- Can be traded at aManufactured Material Trader, See the Manufactured Material guide for gathering materials to trade - Purchase
8 H.N. Shock Mounts- See Inara Commodity Market - Go to a
GuardianTech Broker- Can be found in Inara with Search Nearest - Unlock the
Guardian FSD Boosterwith theTech BrokerContact - You can now purchase
Guardian Frame Shift Drive Boosterfrom any station that sells them- You can perform an Outfitting Search on Inara to find one
- Make sure to update the search to use your current system
Stock up!
While you're at one of these stations, you can make life easier for yourself by stocking on a few spare modules. Use the Buy and Store Modules option in Outfitting. I personally recommend picking up a range of options so that you still have something useful for the occasional small ship.